Introduction
This post is about a simple music player that I made using a Teensy 4.0 microcontroller. The player is capable of playing MP3 and WAV files from a micro SD card. It has a simple user interface which is currently controlled via Serial Inputs( I know this beats the purpose, using a computer to control this, but this can be easily modified to take in other forms of intputs too like buttons, sliders or touch screens). The audio playback is non blocking i.e the Teensy can do other tasks while the music is playing.
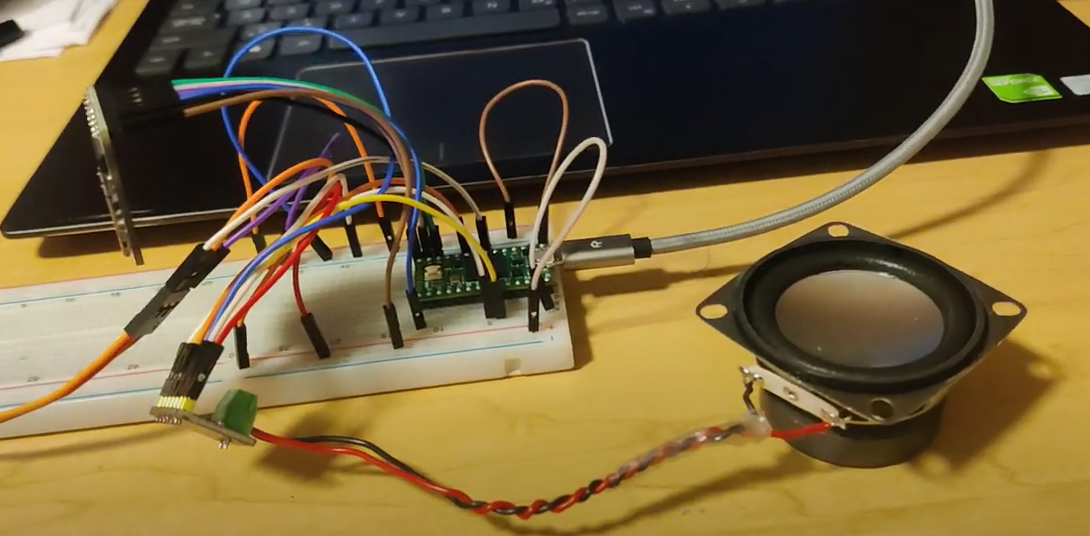
Hardware Used
- Teensy 4.0
- 4 Ohm 3W Speaker
- Adafruit SD Card Breakout Board
- MAX98357A I2S Amplifier
- 16 GB MicroSD Card
- Basic electronic componets (jumper wires, soldering iron, breadboard, micro usb cable)
Software Used
- Arduino IDE to program the Teensy
- Teensy Libraries specifically its Audio.h library.
- Optional programs like Audacity to convert audio files to WAV format and MP3 to edit the metadata of the audio files ex. Audacity.
- If you want to automate the process of audio conversion, then you can use a python script that I wrote. It uses pydub , wave and os modules. This script will automate the conversion of any .wav or .mp3 files into the correct format required by the Teensy to be able to play it, which is 16bit PCM, 44100 Hz.
Circuit Diagram
Well, I havent made any circuit diagram yet, however at the project’s GitHub repository, in the readme file, I have tabulated the connections for each component. You can find it here I also have a YouTube video that I made for this project, you can find it here
How to use
The operation of the player is pretty simple. You connect the Teensy to your computer, and open the serial port at 9600 baud rate. On successful connection, the system prints out a help message to let the user know how to use the player. The help message is as follows:
void Help() {
  Serial.println(Message);
  Serial.println("---------------------------------------------------------");
  Serial.println("Thank you for using the Music Player v1.0. ~~ Nischay J. [28th March 2023]");
  Serial.println("The Player is very simple to operate.");
  Serial.println("You operate using single character inputs.");
  Serial.println("The music player will display all available track at startup.");
  Serial.println("At a time only 10 can be selected.");
  Serial.println("Press 'l'(Lowercase L) to display the current 10 selected tracks." );
  Serial.println("To play a specific track, send the track number (0-9).");
  Serial.println("To stop a track, press 's'");
  Serial.println("Send 'x' to toggle loop of track.");
  Serial.println("To go to the next 10 tracks press 'f' the next 10 tracks will be displayed.");
  Serial.println("To go to the last 10 tracks press 'b' the previous 10 tracks will be displayed.");
  Serial.println("To extend the arm, send 'e'.");
  Serial.println("To retract the arm, send 'r'.");
  Serial.println("Note: The arm is a servo motor and was used to test if the music playing block the Teensy.");
  Serial.println("To see this Help message again, press 'h'.");
  Serial.println("Enjoy your music!");
  Serial.println("---------------------------------------------------------");
}
The system is controlled via single character inputs, this part of the code takes care of it:
 char mode = Serial.read();
    // look for the newline. That's the end of your sentence:
    if (Serial.read() == '\n') {}
    //Serial.printf("Read This %c\n", mode);
    switch(mode){
      case 'h':
        Help();
        break;
      case 'x':
        ToggleLoop();
        break;
      case 's':
        Stop();
        break;
      case 'f':
        MyList.Fwd();
        break;
      case 'b':
        MyList.Bwd();
        break;
      case 'l':
        MyList.DisplayCurrentList();
        break;
      #if USE_I2S == 1
      case 'e':
        analogWrite(PIN_SERVOR, ext_pos);
        break;
      case 'r':
        analogWrite(PIN_SERVOR, ret_pos);
        break;
      #endif
      default:
        int tracknum = MyList.isInList(mode);
        if(tracknum != -1){
          playFile(MyList.SendTrack((uint16_t)tracknum));
        }
        else{
          Serial.println("MP3 Input not Recognized");
        }
        break;
    }
The code snippet above shows how the system is controlled. The user can send a single character input to the system and the system will respond accordingly.
At the heart, there is a dynamically allocated data structure which stores the name of all songs, and our functions use that to send the required song to the SD card.
class SongList{
  private:
    char **Songlist = 0;
    uint16_t numsongs;
    uint16_t listsize_r = ListSize;
    uint16_t counter = 0;
    uint16_t counter_limit = 0;
    void initializeSongList();
    void AddMoreListMember(size_t Size);
    char* stringUpper(char* string_in);
  public:
    uint16_t CurrentTrackNo;
    /*
    SongList Class Constructor
    Initializes the list data structure
    */
    SongList();
    /*
    Displays all the contents in the list. Data is output to the serial port.
    */
    void DisplayListContents();
    /*
    Displays the current 10 tracks that can be selected. The data is output to the serial port.
    */
    void DisplayCurrentList();
    /*
    Finds all the .Wav files in a specified directory. Fills the internal data structure with their name.
    ParameterL rootDir: File pointer to the directory that you want to search the tracks in.
    */
    void SearchSongs(File rootDir);
    /*
    checks if the selected song is in the list. Returns the postiton of the song, otherwise returns -1.
    Parameter: tracknum, a character which should be from 0-9.
    */
    int isInList(char tracknum);
    /*
    Outputs the track name corresponding to the tracknum selected.
    Parameter: tracknum, uint16_t track number selected to play.
    Returns: pointer to the string containing the track name.
    */
    char* SendTrack(uint16_t tracknum);
    /*
    Moves the internal track selector forward by 10 tracks.
    Outputs the list of track that can be selected.
    Data is output to the serial port.
    */
    void Fwd();
    /*
    Moves the internal track selector backward by 10 tracks.
    Outputs the list of track that can be selected.
    Data is output to the serial port.
    */
    void Bwd();
};
For in-depth understanding of the code, please refer to the GitHub repository of this project.
Project Operation Video
I have made a YouTube video for this project, you can find it right below embedded in this post. Or you can click here to go to the video directly.
To do
- Add physical controls like buttons, sliders or touch screen.
- Add a battery to make it portable.
- Add pause and resume functionality.
- Add a volume control.
- Add a shuffle mode.
- Random track selection.
- Fix Audio crackling issue. (This is because the I2S audio wires are long and close to each other and there is no ground plane around them so we are getting interference. I was able to fix it by shielding the wires with aluminium foil, but I need a more permanent solution.)
Thank You for reading this post. If you have any questions, please feel free to ask them in the comments section below.